


The west side of the trail is beautiful, spanning from the heavily forested foothills of the western Cascades, through the Kittitas Valley, and across the sagebrush hills as it drops down to the Columbia River.
There is a map with all of the features, trailheads, detours, and amenities here. You can download it as a GPS file as well.

For the sake of my typing, and your reading, I will break the trail up into sections. Each stretch will have information on features, water, amenities, supplies and any other info that is pertinent to the trail.
*The photos in this post vary in quality due to that fact that they have been taken over the course of ten years on different cameras on many different trips in different conditions. I apologize for some of the lower quality photos. I’m not a photographer, I’m just doing my best to show you the trail.
Table of Contents
- Rattlesnake Lake to Hyak (20 Miles)
- Hyak to Easton (20 Miles)
- Easton to Cle Elum (10 Miles)
- Cle Elum to Ellensburg (30 Miles)
- Ellensburg to the Columbia (35 Miles)
Rattlesnake Lake to Hyak (20 Miles)
This is the most traveled section of the trail and it’s easy to see why. It’s easily accessible, close to Seattle, and let’s be honest- it’s absolutely beautiful. The trail takes you through a dense forest of firs, hemlocks, and cedars as it makes its way through the Western Cascades.
You can park in the Palouse To Cascades Trail State Park parking lot (it’s a State Park so you’ll need a Discover Pass). The parking lot is gated from dusk to 6:30am, and if you’re wondering- yes, you can totally park here overnight. The trail head also has relatively clean vault toilets.
From the parking lot, it’s just about twenty miles to Hyak. The trail surface is hard packed crushed stone and is fast-rolling so you don’t need a huge tire for this section. *Many people ride this section on tires as small as 32mm and it’s not uncommon on the weekends to see entire families enjoying the trail as well as people on comfort bikes.
It’s uphill for the next eighteen miles, but it’s railroad grade, so it never gets steep. This section averages about a 2% grade as it slowly climbs through the I-90 corridor.

As the trail rises up to the pass, it crosses several trestles, and each one is more impressive than the last. They curve around ridges and span tiny creeks flowing hundreds of feet below. As you pedal across these bridges, the trees give way, opening up to sweeping views of the Cascades.
The first trestle goes over Change Creek and it spans between the Deception Crags rock climbing area. This area can be pretty busy on weekends and the trail around the rocks will often have many people on it. Spotters are often looking out for climbers above instead of oncoming cyclists so it’s a good idea to slow down through this stretch.
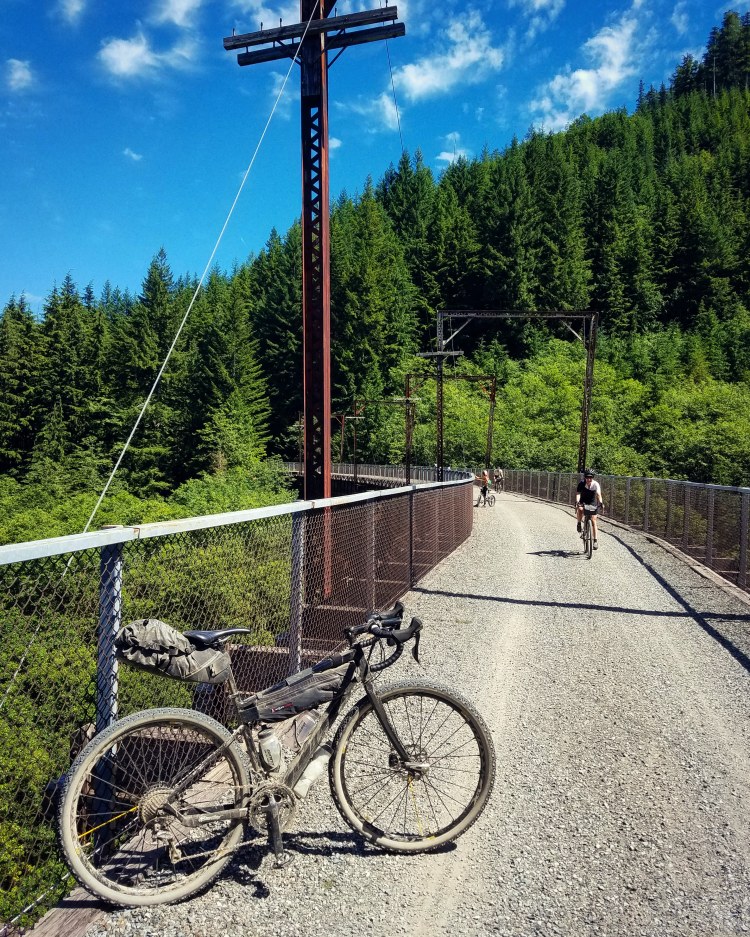
Shortly after Change Creek, you will cross the Hall Creek Trestle which sweeps to the left in a large curve. The center span of this bridge was destroyed in 1988 when a winter storm caused a flood of debris to destroy the lower footings, sending the span into the chasm below. State parks replaced the center span in 1998, making the trail complete once more.
There will be two more trestles on your way up, one that sweeps out over Mine Creek, and the final one over Hansen Creek. All of these trestles were originally built as timber structures and converted to steel soon after. The views that they provide are expansive, and the engineering required to build them in the early 1900’s is nothing short of amazing.

The scenery on the trail can vary widely depending upon the time of year that you ride. A fall ride (my favorite season) will treat you to some spectacular colors and that late afternoon sunlight that you only get as the summer fades away. During spring, there will be wildflower blooms and small seasonal creeks that dance down the side of the trail. In early summer, those same creeks can turn into full blown waterfalls, rushing down the rocks beside you. *the weather can also vary widely so be aware and be prepared.
The sign posts for the old railroad stops still line the side of the trail, and as you ascend you’ll pass Cedar Falls, Ragnar (which is one of the few depots with equipment still present), Garcia, and Bandera.
You will pass two primitive campgrounds on your way up- Alice Creek, and Carter Creek. Both of these sites are hike-in or bike-in only and are both trail side. They have no water and fires are not allowed. They each have several nice pads for tents, a picnic table, and a clean vault toilet as well. They are first come, first served.
*As always LEAVE NO TRACE.
*Alice Creek is a decent place to camp, but Carter Creek (which sits down below the trail where the creek rushes over massive boulders and logs) is a truly wonderful spot to spend the night.


As the trail continues to climb into the Cascades, you’ll come to an old snow shed, once used to shield the trains in the winter. From here, it’s a quick ride to the western portal of the Snoqualmie Tunnel.
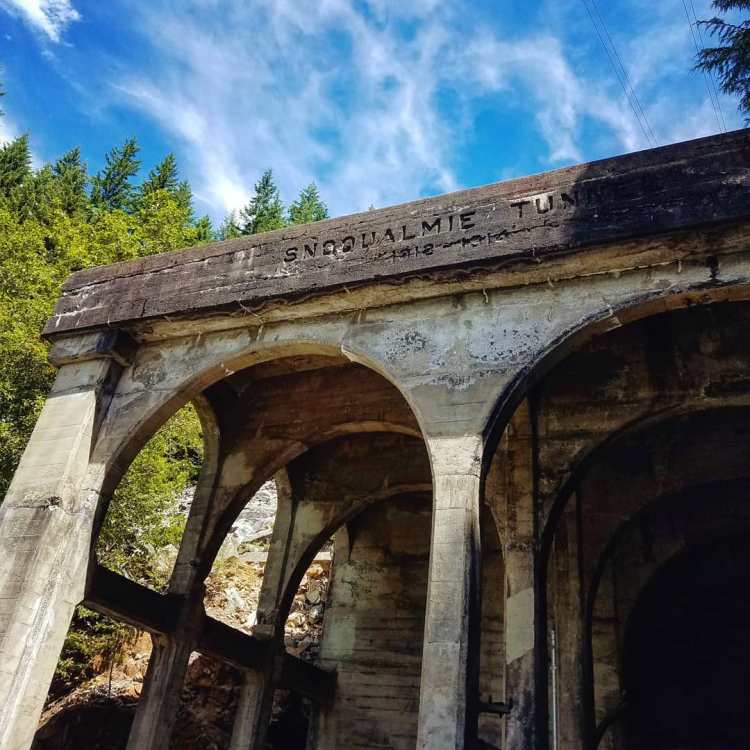
For many people, the Snoqualmie Tunnel is the destination on a one day ride, and it’s not without good reason. The western portal is an imposing presence. Even on the sunniest of days it can easily lead one’s imagination to fantastic places.

The Snoqualmie Tunnel was blasted through the mountain between 1912 and 1914. It is an absolute marvel of engineering given that it is 2.3 miles long.
It’s difficult to describe the experience of it, regardless of how many times I’ve ridden through it. On the clearest and sunniest of days, you’ll be able to see what appears to be the dimmest, distant star in the blackness; nothing more than a pinpoint… and that is the other side.
Even at a brisk pace, it’ll take just under ten minutes to reach the other end and that’s a long time to be in the dark and cold depths underneath a mountain. While it can be fun to ride through as fast as you can, I always like to stop at the midpoint, turn off my lights, and let the darkness swallow me.
It is all encompassing. You will lose all sense of direction almost immediately as you are left alone with nothing but the sound of your own heartbeat and the steady dripping of water from above.

The tunnel’s surface is hard pack with little potholes all the way through, formed from the water that drips year-round from the ceiling. The climate inside the tunnel varies depending on when you are there. It can be a cool and welcome break from the heat of a late August afternoon, or it can be lined with thawing, sparkling frost as the spring melt takes hold.
Keep in mind that the tunnel can act as a venturi, with the prevailing wind picking up speed as it’s forced through the passage towards the east. So, what may be a quick and pleasant ride to the east side can suddenly be misery as you grind through a freezing headwind on the way back. *plan and prepare accordingly
The tunnel entrance has a few picnic tables and a vault toilet near it. To the left, Rockdale Creek cascades from up above and makes its way down under I-90 into the south fork of the Snoqualmie River.
The tunnel requires several things to ride through it successfully.
- Warm clothing: a light jacket or arm warmers, and full gloves in the colder months. The tunnel is quite cold regardless of the outside temperature. Even in the peak of summer when it’s eighty degrees outside, it will be forty degrees inside the tunnel. If you are riding it in spring when it first opens, the edges of the tunnel can still be lined with ice. It won’t take long for your fingers and face to go numb.
- Lights: The brighter the better. The tunnel is pitch black inside and you will find it impossible to ride a bike through it without ample light. The faster you ride, the more light you need. The tiny little light you use for daytime riding will be useless in the tunnel. Aim your light down and to the right so you don’t blind oncoming cyclists and hikers. pro tip: your lights work way better when you take off your sunglasses. 🙂
- Courtesy: depending on when you are there, you may be be the only person in the tunnel, however, it is a destination for many, and on warmer days it will be well traveled with families, hikers, and other cyclists. Slow down, yield appropriately, and don’t be a jerk.
- Timing: The tunnel is closed from November to (usually) May. During the winter, the trail is covered in snow and ice forms along the ceiling and walls.


*It’s important to appreciate the tunnel as a monument that is accessible to the public. The tunnel was closed for several years due to dangerous conditions inside. It’s only been reopened since 2011. State parks did a lot of work to ensure that the Snoqualmie Tunnel would be an adventure destination for years to come.

As you exit the tunnel, you’ll emerge near Hyak Sno-Park just past the Summit of Snoquamie Pass. There are picnic tables and a large rest facility in the parking lot with clean bathrooms (where you can refill bottles), and quarter-operated showers. There is also a convenient bike repair stand here.
*fun fact- Originally designed and built by the railroad, the first ski area at Hyak opened in 1938 with a massive two-story lodge and was called the Milwaukee Ski Bowl. It was only accessible by train and at the time, had the only ski lift in the northwest. Lights powered by the railroad’s electric lines also made it the only place in the northwest that offered night skiing. A popular winter destination, packed ski trains carried people to the resort until a fire tore through the lodge in 1949. The railroad sold the property and the current Hyak Sno-Park opened in 1959.
Hyak (which is a Chinook word for swift or fast) is a great place to refuel and take a break, especially on a sunny afternoon. For many people, Hyak is the destination for the day. If you turn around and ride back you will get about forty miles and the ride back is all downhill. While it may not have felt that steep on the way up, the difference is clear on the way down; it’s really easy to go really fast.
Those who choose to go on will soon come to Keechelus Lake and beyond….

Hyak to Easton (20 miles)
As you leave Hyak, your experience will depend a lot on the season that you’re riding. In May, you may encounter a lot of mud with snow still lining the trail. In August, you’ll find a dry and dusty trail that disappears on the horizon.
The first thing you’ll notice is the difference in the gravel. The groomed hard pack that was so smooth on the way up is quickly replaced with a looser and dustier surface that requires you to push a little harder to move through. You can give up all hope for the return of that nice surface that got you here, you are leaving it behind forever, and the further East you go, the larger tire you will need (going forward from this point I recommend a minimum of a 40mm tire).

Keechelus Lake will appear on the left, at first with a few peeks, and then you’ll be riding alongside of it for several miles. I-90 appears as a tiny ribbon on the opposite bank. Keechelus is a natural lake and the source of the Yakima River, but it’s outflow is now controlled by a dam on the south end.
*fun fact- Keechelus is a native term for “Few Fish”, which is in direct contrast to nearby Kachess Lake, which means “Many Fish”. Snoqualmie pass was used by Natives to cross the Cascades long before any rail lines or roads existed here.
The lake changes drastically during the summer; its water level plummets, exposing the remnants of an old growth forest that once lined its banks. As you make your way to the southern edge of the lake, you will pass the remaining concrete foundations of two large snow sheds and several creeks which feed the lake; Cold Creek, Roaring Creek, and Meadow Creek. Cold Creek and Roaring Creek both have a primitive camp ground with a picnic table and a vault toilet.

As you leave the lake behind, the trail will parallel Lost Lake Road and some cabins before crossing Stampede Pass Road (There is an amazing gravel loop up Stampede Pass but I’ll save that for another post). This section of trail gives you the first clues to the changing landscape as towering long-needled pines begin to mix with the cedars and firs around you.
You’ll pass the old sign for Whittier, a long gone rail road stop and then eventually you’ll come to Tunnel 49, also known as the Whittier Tunnel (that makes the Snoqualmie Tunnel #50 if you’re counting). While not nearly as impressive, this tunnel always feels odd in that it’s just kind of out there in the middle of nowhere on the trail. Other than the power lines that run above it, it’s the only real landmark for miles in both directions.
It also happens to be just long enough to really mess with your sense of direction if you try and ride through it without taking off your sunglasses.

The trail continues east and as you approach Cabin Creek, the trees will become more dense and outcrops of rock will begin to sprout up beside you. At this point, Monahan Road will actually merge with the trail for a short distance. This section is well signed as being shared with traffic, and you’ll immediately know that cars have been on this stretch due to the washboard surface. Personally, I’ve only encountered one car on this section of trail.
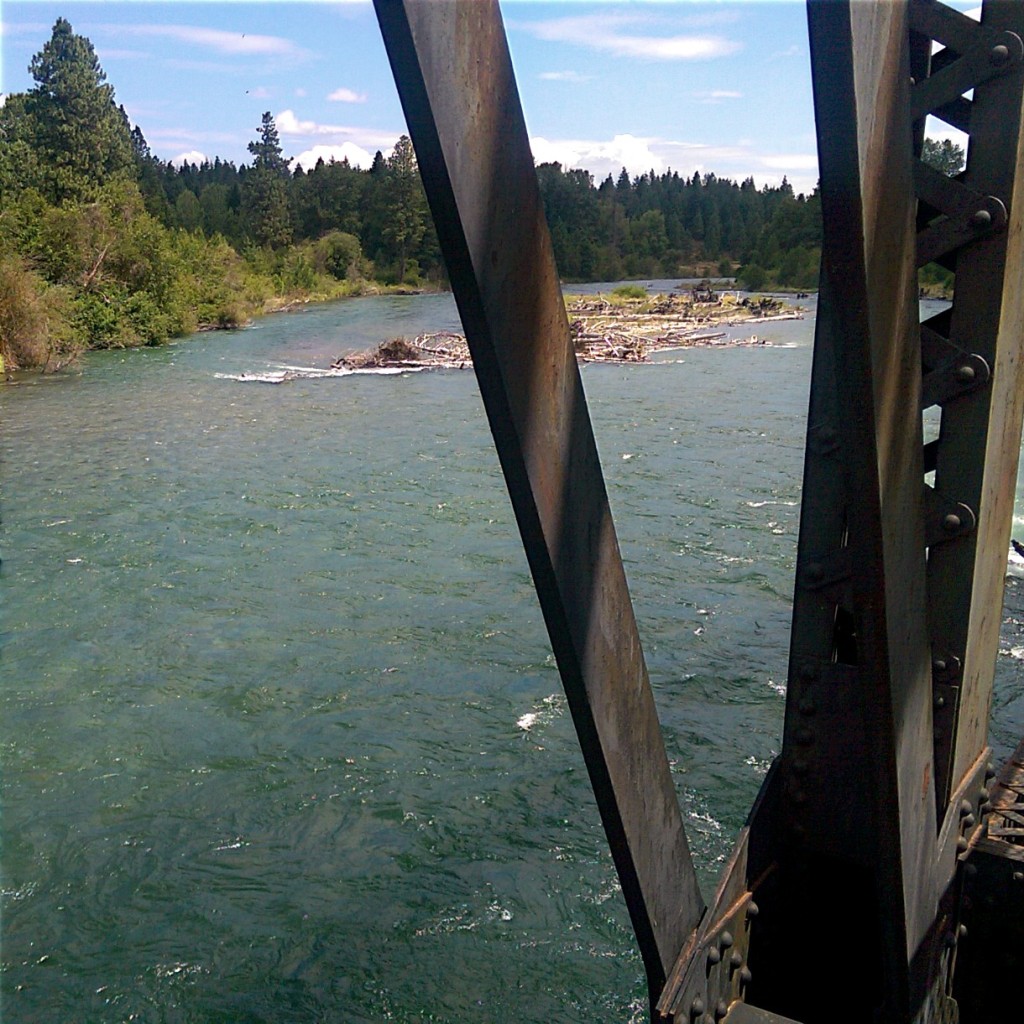
You’ll cross a small bridge over Cabin Creek and then the shared road will separate (the road curves to the right, and the trail stays left), leaving you and your bike alone on the trail once more. Just up ahead, the trees will give way as you pedal underneath a slew of massive power lines and cross a bridge over a river. This is the first view you’ll have of the Yakima on your journey, but don’t worry, you will soon be well acquainted with this river.

Even though the view is quite expansive here, it can be slightly unnerving to stop on the bridge. The sound of the river moving lazily below is drowned out by the power lines overhead. A constant dull, relentless buzz intrudes upon the scene. It’s impressive, but I never stay on the bridge for very long.
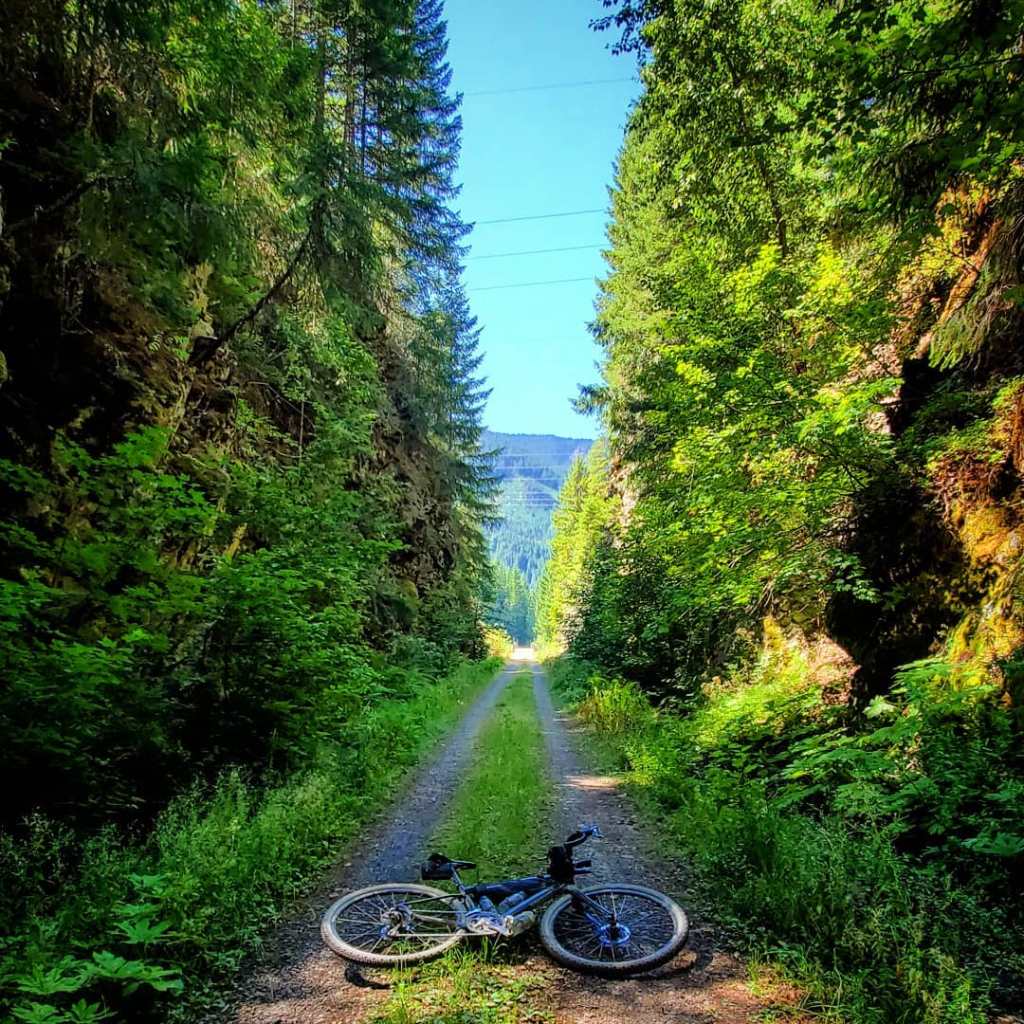
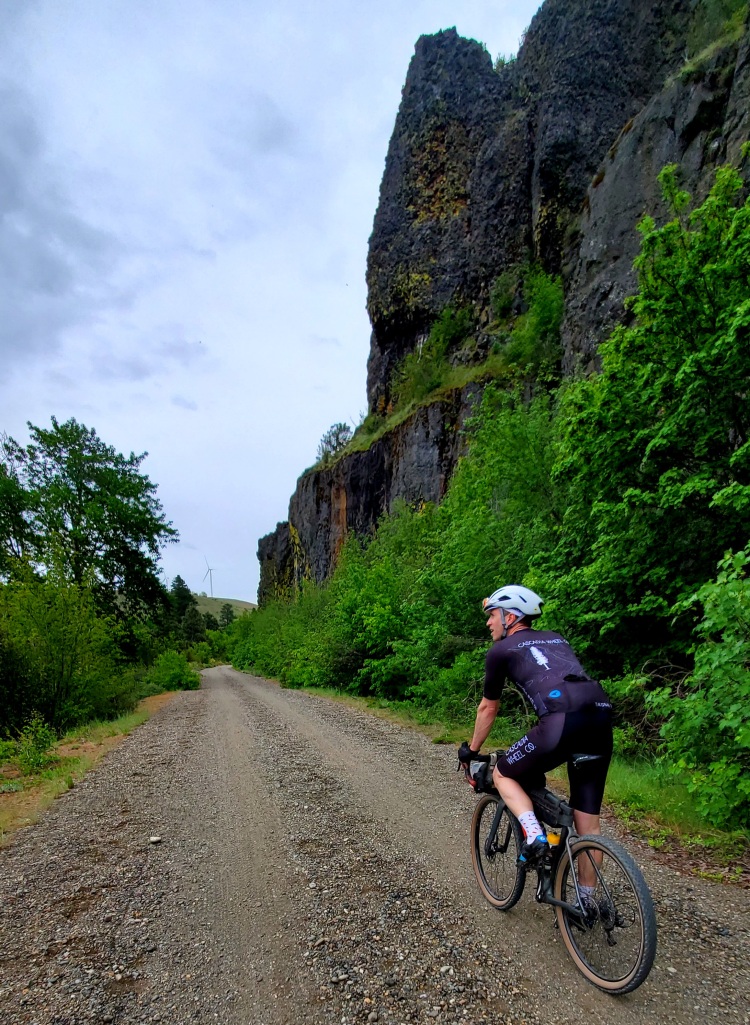
As the trail gets closer to Easton the terrain becomes more rugged with larger basalt structures lining the edges. These sections were blasted through in the early 1900’s, and now, ferns and towering pines cling to the rocks as they stretch up to the sky above.
This is a beautiful section of the trail, and it doesn’t last long, so if you race through it you’ll miss it. I always slow down through this stretch and take my time because I know that the huge trees lining the trail only last for a few more miles, and once they’re gone, so is the shade.


Making your way through the forest, the trail will break into two. Going to the left will take you to the State Park, and staying to the right will take you beyond to the town of Easton. *If you are camping at Easton, you need to take the left path.
Lake Easton is a natural lake that was dammed in 1929. It is fed by both the Yakima and the Kachess rivers from its western shore and the Yakima continues on from its eastern edge.


The Lake is surrounded by Lake Easton State Park, and is a common camping spot for trail users. The park has two dedicated hike/bike campsites and all of the standard facilities you’d expect from a Washington State Park such as fire rings, bathrooms, showers, and trashcans. You can purchase firewood at the check in station. *If you camp here, I recommend ear plugs. The campsites are close enough to I-90 that the traffic noise can be a problem for lighter sleepers.
Back on the main trail, as you continue East, the trees will give way as you cross a long bridge. On the right side is the Yakima River, on the left is Lake Easton.
You will pass around several gates as you make your way past the lake, and you will come to the the third tunnel on your journey. Tunnel 48, or the Easton Tunnel, is short enough to ride straight through without lights, but the forest growing above it is always impressive.

Beyond the tunnel, the trees will begin to thin as you pass a small diversion dam on the left which diverts water from the Yakima River to an irrigation canal. From here, the trail emerges onto Cabin Creek Road in the town of Easton. Follow the road a short distance and rejoice in the smoothness of pavement!
The trail picks back up at the Fire Station, and a short distance beyond, a trail head will appear on your right. This is the Easton Trail Head. It has a picnic table, a vault toilet, and a water spigot as well.
This is a great place to stop for lunch and a rest if you have a longer day planned. It’s almost exactly forty miles from Rattlesnake Lake, and the shade of the towering pine trees over that picnic table is about to be extremely difficult to find.
Easton to Cle Elum (10 miles)
I’ll just be honest- the next ten miles are going to be rough. As soon as you depart from the Easton trail head, the trail surface changes pretty drastically. It’s a little more manageable if it has rained recently, but in the summer, this stretch can be brutal, especially if you’ve ridden straight through to this point.

The gravel here is dry, dusty, and deep. The aggregate is larger and looser than most of what you’ve ridden on, and large egg-sized chunks are scattered along the trail. For most of this stretch, it is laid from edge to edge, forcing you to find and ride in a skinny, worn track made from previous passersby.
Even in this track, it’s hard to find a rhythm. It’s littered with the occasional larger rock, forcing you out into the deep stuff where your front tire floats for an instant before catching traction and finding its way forward.

This section is also long and relatively straight, stretching into the distance and giving the impression that there is no end in sight. On a good day, this ten mile stretch will be hard riding. On a bad day, this stretch will suck the life out of you and make you question what you are even doing out here.
The only solace you will find here is that the winds blow from the west, and a good tailwind will make this section a little easier. A good friend to suffer alongside of you also goes a long way.
The trail crosses several roads, some railroad tracks, and a few small creeks. It sweeps in several large curves, but for the most part, it’s just a steady grind. You’ll cross the Yakima twice. The first bridge is near a golf course, the second is where the Cle Elum River feeds into the Yakima.
Here, the rivers converge, forming a massive sandbar that’s littered with fallen trees. The water here is deep, fast moving, and powerful.
The real treat of this area is the slow shift that takes place in the environment around you. The firs and hemlocks are far less prevalent as they are replaced with pines, and the sword ferns give way to tall grasses as you slowly make your way east.
New scents float through the air, which now feels drier. Strange insects call from the grasses, and birds sing songs that were foreign on the western side of the Cascades.
Eventually, you will ride into South Cle Elum. A substation which once powered the railroad will be on your left followed by the old Milwaukee Road station house.
The Station House used to be a restaurant, but it has since closed and moved east to Ellensburg, so if you’re looking to get some food here, you’ll need to ride across the bridge and into town where you will find plenty of fast-food options, a gas station, and a Safeway as well.
In any case, take a break. Enjoy the scenery. You’ve earned it.
Update July 2020: Most of this section has been pretty worn down and is now pretty fast rolling. If you want to know what it used to be like, just ride in the center section and imagine that being spread edge to edge.


Cle Elum to Ellensburg (30 miles)
This is one of my favorite stretches of the trail, but you’re going to have to work for it. Oh, were you hoping that the gravel would improve? Don’t worry, it will… But not for a few more miles. You’re going to have to settle in and get back into the grind.
As you leave Cle Elum, the trail remains the same loose and deep surface that you’ve been on, and depending on recent trail activity and rains, it can also be chewed up with horse prints and sandier sections.
The next five miles is long and straight, and the only section of smoothish trail here is a small, marshy stretch where the rocks have been washed out with water, leaving behind a smooth double track with lush vegetation. The grass in the middle can get quite tall and there is often standing water in this spot. As soon as you’re past it, though, the loose and dry gravel returns.

There is a hill looming in the distance, and you just need to get to it. As the trail approaches that hill, it drops to the left into the Upper Yakima Canyon. On the way there, it crosses a few small roads and it’ll go under I-90 as well. You’ll see glimpses of a road to your right, and it may be tempting to get out on it and enjoy that sweet, smooth pavement. Just keep in mind that while the shade may be minimal on the trail, there is virtually none on the road. The trade off is up to you.
Lower Peoh Point Road parallels the trail for quite a while, and you can catch it all the way back in Cle Elum where you left from. Some people enjoy the break and treat themselves to a smooth ride, while others want to ride the trail in it’s entirety, even if it means suffering a little bit more. I’m not going to judge you, nor should anyone else, just make sure that if you take the road, you get back on the trail before the road leaves it.
*There is a gravel driveway on the left, about four and a half miles from the BBQ joint, and it crosses the trail. This is where you need to get back on.

The trail will begin to sweep to the left as it approaches the hill and dips alongside of it. The trees will thicken as the river comes into view, and you will be treated to some much needed shade.
The dry and dusty trail that you’ve been riding on gives way to a riparian corridor lined with willows, alders, maples, and dogwoods. The change is drastic, and while it may not seem like a real canyon quite yet, the landscape will soon show plenty of evidence of the Yakima’s power as you move further into it.
The next fifteen miles of trail are some of my favorite, mainly due to how much the environment shifts over such a small distance. Take your time and enjoy the scenery.

The trail will slowly meander its way along the river, passing several picnic sites as the river moves in and out of view. Depending on the season, you may see people fishing down below, and as summer peaks, you’ll see rafters and tubers enjoying the water and sunshine.
Spring and early summer will provide lush greenery all around, while in late summer, the pines will be the dominant green against sweeping golden hillsides. A late fall ride will provide displays of spectacular colors from the deciduous trees along the river.
A few miles in, you’ll pass Ponderosa Campground, another primitive campsite with a vault toilet, a picnic table, and several tent pads. You’ll also come across several gates in this stretch. Please make sure that you close and latch all of them behind you.
As the canyon begins to narrow, huge basalt towers will rise to your right, forcing the trail down onto the river and giving you a view of old Highway 10 and the rolling, golden hills across the way.


This is where this section of the trail gets so wonderful- as the canyon walls get higher, the basalt structures become more impressive as they tower above you. It’s completely different than anywhere else you’ve ridden up to this point. The arid landscape is cut cleanly with the river, and even in the driest of months, there is plenty of life here.
If you’re lucky, you’ll catch some movement high up on the cliffs as bighorn sheep make their way along the bluffs, and down below you’ll find evidence of deer, coyote, quail, and predatory birds.


The trail meanders with the river’s twists and turns as it moves deeper into the canyon. Every turn provides more views of cliffs, bluffs, and the windmills high above the golden fields on the opposite bank. Eventually, you’ll come around a small bend to tunnel 47.
There are two tunnels in the canyon, and they aren’t far from each other. Like the Snoqualmie Tunnel, these tunnels were also closed for several years. The first time I rode through them I had to sign a waiver before entering. The interiors were littered with rockfall and it was clear that the walls and ceilings were slowly failing. The following year, I was pleasantly surprised to find both tunnels completely refurbished inside.
Tunnel 47 is the longer of the two and it curves to the right just enough that you can’t see the other side from the entrance. This tunnel will require a light, but the darkness that awaits you inside will be a welcome break from the heat.


Exiting the tunnel, you’ll pass a nice little picnic area, followed by a long abandoned homestead and farm. It’s very tempting to go down and explore the farm, but there are signs asking you not to, as it is private property.
It must have been a wonderful little home at one time, perched right on the Yakima River and surrounded by towering cliffs. It’s technically part of Springwood Ranch, which was once owned by Stuart Anderson, the founder of the Black Angus restaurant chain.


The farm is in a serious state of disrepair. The barn is collapsing and many of the outbuildings are flattened. The house has been slowly sinking into its own cellar over the years and the grass is just tall enough to hide sharp, rusty objects as well as the possible rattlesnake. I highly recommend that you respect the park boundaries.
The trail continues past the farm and before you know it, you’ll come to Tunnel 46. This tunnel curves as well but it’s shorter than the first. As you emerge from this tunnel, it is apparent just how much work has been done to preserve the entrance and keep the trail intact.


From here, you’ll follow the river as the cliffs and bluffs above you begin to subside, giving you sneak peeks of farmland and what’s to come. You’ll approach a grove of trees as the river leaves the trail and cross a small bridge over Taneum Creek. Here, the trail will dip down slightly, and just like that, as you emerge from the grove of trees, the golden fields of the Kittitas Valley, and Eastern Washington open up before you.
The change happens so fast that it’s difficult to believe you were just in a canyon with tunnels and towering cliffs. The valley opens up wide and the flatness ahead is quite a shock in comparison.
Depending on the time of year that you’re here, the valley can be either lush and green, or arid and gold. As the trail rolls on, you’ll pass several road crossings, all with large cattle gates. Make sure you latch them all behind you.

You’ll cross a few small bridges over irrigation canals, before coming to the Thorp Trail Head, which consists of a vault toilet, a few picnic tables, and a large gravel parking lot with hitching posts for horses. *There is no water available here.

Not far from the trail head you’ll hear the traffic from I-90 as it once again parallels the trail, and after crossing Thorp Highway you’ll come to the Shree Travel Plaza, which is home to a large (and air conditioned) convenience store and the Thorp Fruit Stand and Antique Mall (the Fruit Stand has amazing ice cream).
Treat yourself to some cold beverages, you’re almost to Ellensburg.
The trail is long, flat, and straight for the next ten miles. There are a few bridges over highways, creeks, and the Yakima River, and other than a small little paved detour at Faust Road, it’s just you and a gravel path stretching to the horizon.


If you’re lucky, you’ll have a strong tailwind assisting you into town, otherwise, it’s just a long steady grind ahead as the signs of civilization slowly begin to appear around you. The trail runs alongside a small neighborhood on the outskirts of town, and before you know it, you’ll be riding along a fence line, looking into people’s backyards. Trail use here is common, and as you approach town, you’ll see joggers, dog walkers, other cyclists, and maybe even a few horseback riders.
The trail ends on Water Street, just north of downtown. Ellensburg is the largest city on the trail and is a destination for many of its users. It’s a great place to celebrate the end of your journey, or to resupply and rest. Ellensburg has all of the amenities you’d expect for a town of its size, so take a moment to grab a coffee, a beer and a meal, and some rest. They also have a bike shop in town if you need any assistance.
There are many restaurants to choose from; The Pearl is a great lunch or dinner spot to reload your carbs, and Bar Julep makes a fantastic cocktail. There are also multiple cafes, taco trucks, pizza places, and a Safeway.

I am a big proponent of spending money in the towns along the trail. Trail users are essentially tourists, and our dollars go a long way in getting locals to see value in the trail. Plus, if you plan ahead and buy most of your food and supplies along the way, you can pack much lighter on your bike.
If you are continuing on the trail, this may be your last go at the comforts of a hotel depending on your plan and route. You’ve ridden almost eighty miles to get here and a hot tub, shower, and a real bed can really boost your morale. Booking a hotel usually gets you a free breakfast as well, and bagels and bananas happen to fit quite nicely into jersey pockets. You can also wash your clothes in most hotels.
If hotel life isn’t for you, The KOA is just outside of town and offers great camping spots. Much like Easton, I recommend ear plugs here as it is right off I-90.
Ellensburg to the Columbia (35 miles)
The trail picks up on the east side of Ellensburg, just outside of the Rodeo grounds. It’s just under six miles of very straight, very flat gravel to the town of Kittitas, which is your last chance for any supplies for the foreseeable future.
This section of trail gives you only a hint of what’s to come, as the gravel here becomes a mix of larger rock chunks and dry sand. It seems to stretch to the horizon, disappearing into the distance of farmland and ranches.


Shade becomes a luxury in this stretch, and while the farmland around you may be lush and green, the trail quickly becomes dusty, arid, and unwelcoming as the sun rises higher. There are a few trees around Naneum creek that offer some solace, but for the most part, it’s a just a long and straight push through chunky gravel into town.
The trail will cross Kittitas Highway as it continues along the southern edge of town. If you take a left on Main street , you can take a quick detour to Johnny’s Market. This is your last chance to refill on water and food before you enter the Yakima Training Center.
You will need at least enough water to get to the Columbia, which is about thirty dry and dusty miles away. There is no shade, and the temperatures here can be brutal, even in spring. If you are riding this stretch in the heat, my advice is to take more water than you think you’ll need.
Leaving Kittitas, the trail continues east as it parallels Parke Creek Road with a hill looming ahead. You’ll have three road crossings as I-90 comes into view on the right, and then you’ll begin a steady climb to the The Renslow Trestle, which was refurbished and opened as part of the trail in April of 2021.

The 680 foot long trestle crosses 118 feet above I-90, providing some sweeping views of the Kittitas Valley. Until recently, a detour was required to get around the freeway, as the Bridge had no decking or railing and was unsafe to travel on.
*Fun Fact: It was originally constructed as a timber frame bridge in 1908, and then replaced with the current steel structure in 1909. The footings happened to be spaced in a way that allowed I-90 to be constructed in the late 1950’s without any disturbance to the bridge above.
It goes without saying that the completion of the bridge was much needed, and it’s an extremely valuable piece of infrastructure for the trail. The hard work and constant efforts of The Palouse To Cascades Trail Coalition, State Parks, The Cascade Rail Foundation, and everyone else who advocates for the trail are much appreciated.


*Be aware when crossing the bridge that the winds can be absolutely brutal when you are that high up, and gusts of 40-50 mph are not uncommon on particularly windy days.
Once over the bridge, you will be entering the Yakima Training Center, which is a massive expanse of land stretching across the Western Saddle Mountains. It is a training ground for the United States Army, which also happens to be responsible for maintaining this section of the trail.

Because it runs through US Government property, it is imperative that you adhere to all guidelines given at the registration kiosk which is located on the left of the trail about a half mile past the trestle (You can also find those guidelines here). You will need to fill out a registration card at the kiosk, part of the card goes into the registration bin, and the other part goes with you. Please read all rules and regulations so that you don’t get a visit from a US Army vehicle.
*Below the Kiosk there is a trailhead and parking lot with a pit toilet. You can camp here but you must have permission ahead of time, which you can get from the the Manager of the YTC Morale, Welfare and Recreation Office at 509-577-3208.
I can’t stress enough how important it is to be prepared for this section of the trail. It is twenty-two miles to the Columbia and there is nowhere to bail if you need to. You cannot leave the trail, and there is no cellular service for a large section of this stretch. There is very little shade to be found, and the heat can be punishing as the day moves on.
On the best of days, the Yakima Training Center can be an absolutely inhospitable place. That said, desolation can also bring solace, and this stretch definitely has its own beauty.


As you begin heading east, the first thing you’ll realize is that the gravel is pretty much gone. The trail surface through this stretch is just sand lined by a lot of sagebrush and wildflowers. However, it’s not super soft like beach sand, it’s a course and loose surface that has been beaten and torn up by horses. If you’re lucky, the surface will be a little more packed down after a recent rain, and if not, it’ll have you wishing for a larger tire.
The Boylston tunnel is almost five miles up the trail, and it’s a steady two percent grade all the way there. It’s best to just settle in and deal with the bumpy ride.
Did I say ‘bumpy ride‘? That term can’t prepare you for the surface of this stretch. It’s kind of like washboard except it stretches from edge to edge of the trail. There is no worn path where the horses haven’t been, so you’re just kind of stuck with it. I definitely recommend a pretty significant tire on this stretch, and I wouldn’t do it on anything smaller than 45 millimeters.
The trail turns south away from the freeway pretty quickly, and before you know it, you find yourself alone in the desert pedaling uphill through sand (this sounds fun, right?). If you time it right, there will be an abundance of wildflowers along the trail, otherwise, it’s just sagebrush and golden hills for as far as you can see.


Boylston was the location of a train depot and is the high point of this route. Once you get past this section, it’s about eighteen miles of glorious downhill to the Columbia. Don’t get too excited, though. First, you must actually get past the tunnel, and this is not as easy as it sounds.
As you approach the Boylston Tunnel (Originally called the Johnson Creek Tunnel, or Tunnel 45), You have a decision to make: Do you attempt to go through the tunnel? Or do you take the detour that the army has provided? A sign is posted, warning that the tunnel is a rock fall hazard, but the provided detour also looks less than promising.
The good news for you, is that I’ve done both, and I’m going to show you both options and let you choose your own adventure.


Option A: The Tunnel.
The Boylston tunnel is in pretty bad shape. Tunnels 46, 47, 48, 49, and 50 have all been completely renovated, making for safe and easy passage through them. This tunnel, however, is exactly what you would expect from a structure that is over one hundred years old and has been largely abandoned since 1980.
The first time I rode through it (2014), the entrance was littered with massive rock fall which required quite a bit of hiking. At some point, the Army cleared out the entrance, smoothing everything out and making the western portal accessible . Currently, The entrance is filled with tumbleweeds that have blown in from the surrounding high ground. These tumbleweeds are about ten feet deep on the left, leaving a somewhat (I stress the term ‘somewhat’) hike-able path on the right for you and your bike.


The ceiling of Tunnel 45 is reinforced with smooth concrete at both ends, but the center consists of the the chunky basalt that the tunnel was cut through. There are massive wooden braces in the center section, but there is still a lot of rockfall littering the trail surface.
This tunnel is 1,975 feet long and has a slight curve to it, so a bright light is definitely required. I’ve always been able to ride straight through by picking a good line, but depending on the brightness of your light and your bike handling skills, you may find yourself walking through the center span, which, given the amount of rockfall, can be very unnerving.
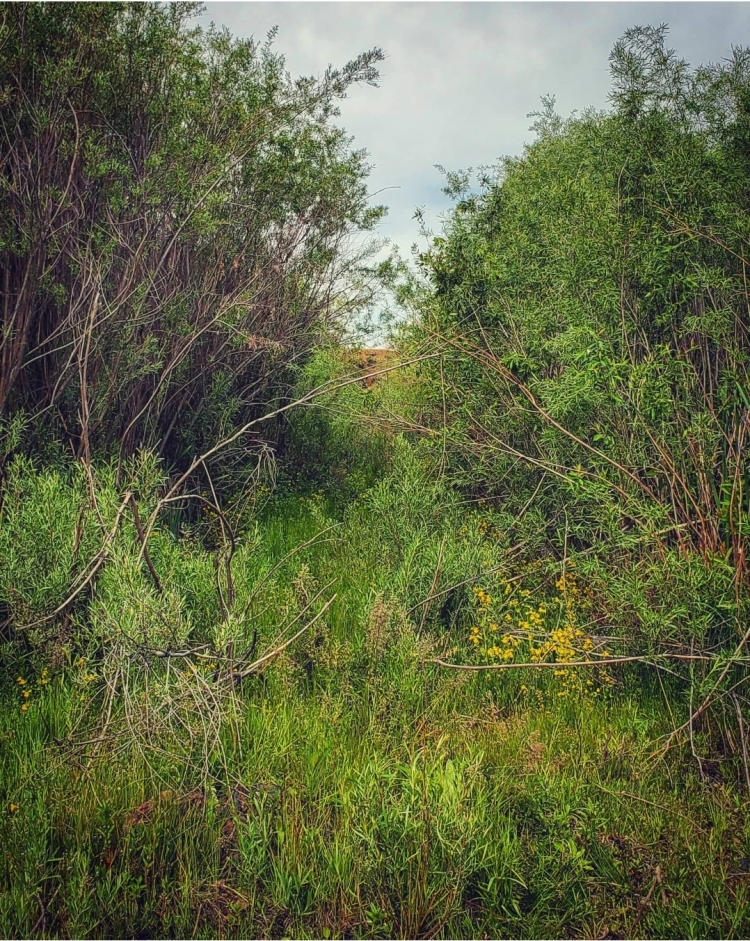
The eastern end opens up into a green oasis. The walls lining the tunnel exit are abundant with plants and blooming flowers, while bird songs reverberate through the rock cut. The surface here is smooth and fast rolling, but don’t get lulled into a false sense of security, it’s going to get much worse before it gets any better.
Before you know it, the greenery closes in around you and the trail surface turns into a soggy marsh. A large, dense willow thicket encloses the end of the eastern tunnel cut and you will have to bushwhack your way out (seriously, without a machete or a chainsaw it is absolutely miserable).
It is extremely slow going as there is no real path here. There are some trees that have been laid down horizontally, but for the most part, you are blindly dragging your bike through unbelievably thick vegetation. You will come out with wet, muddy feet, and a whole lot of scratches from branches and twigs. *Also, it’s good advice to check yourself for ticks after you emerge.
I can’t really recommend the tunnel as a viable route, because if your derailleur or brake hose were to snag on something, it could leave your bike completely inoperable in the middle of nowhere. The bypass is there for a reason, and until the tunnel is repaired and the willows are cleared out, it’s a far better option.
Option B: The Bypass.
The bypass has a nice sign pointing to its general direction, however, depending on when the Army last serviced the trail, the first couple hundred yards or so may be overgrown, and you may find yourself hiking your bike through chest high vegetation which will leave you with some small scratches on your arms and legs. *I’d check for ticks here as well after you get through.
Once you get past the overgrowth, you’ll find that the Army has provided you a bypass that is surfaced with large, sharp chunks of rock. It’s basically just railroad ballast, and since it’s not really ever driven on by larger vehicles, there is only a small path that is well enough traveled to be sort of smooth.
The other issue here is that the bypass has to go up and over the tunnel, resulting in some steeper climbs. My Garmin read 11-12% more than once and if you can imagine climbing or descending a loose and rocky grade that steep on a fully loaded bike, you can also imagine how quickly you will have to get off of your bike and hike it.


The bypass is fully exposed with no shade to be had. It’s roughly a half mile longer than going through the tunnel with about two hundred feet of elevation gain. The bright side is that it provides some really nice views down into the eastern tunnel cut, giving you a glimpse of all that lush greenery and the willow swamp.
Overall, both of these options leave a lot to be desired, and it’s a shame that the Army doesn’t maintain the area around the tunnel as well as the rest of the trail. With the Renslow Trestle repaired and open, Boylston becomes the final hurdle on the way to the Columbia.
*It’s important to recognize that the Army has done some really amazing work on this trail. A wildfire tore through this area in 2014, burning six of the wooden trestles that spanned the undulating landscape. The army replaced them all with Earth fill and culverts, ensuring that future fires would not leave the trail unrideable.

Okay, so now you’ve chosen how you want to suffer and you made it through. Congratulations! Your reward is a steady descent to the banks of the Columbia River with sweeping views of the surrounding landscape and spectacular basalt formations.
You’re going to go fast. The surface is still sand, but you’re going downhill, and if your tire is big enough to float, you can put it in the big ring and fly. Depending on the wind, it’s not difficult to reach speeds over twenty miles per hour as you make your way down through the rock cuts.
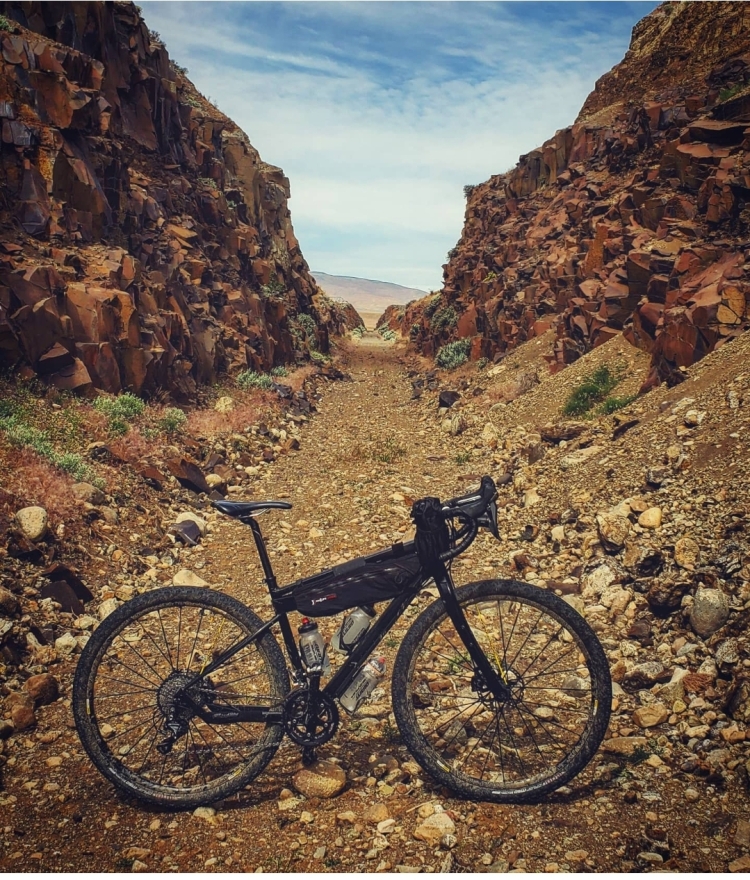
The railroad blasted through the tops of the hills to ensure a steady grade, and in doing so, created some extremely impressive cuts that feel like canyons. Some are deeper and longer than others, but just keep in mind that the floor of these cuts tend to have some rock fall, so slow down through them so you can safely pick a line.
This area is filled with wildlife, and you’ll catch views of deer, hawks, owls, and maybe even a turkey if you’re lucky. There are also a lot of alkali bees and sweat bees, both of which are generally harmless, but it’s good to be aware that they are there.


As you make your way down to the river, the trail will offer up vast views of the surrounding hills and valleys. This area has its own beauty to it, and is unlike any other part of the trail west of the Columbia. The emptiness is all encompassing, and every time you emerge from a rocky canyon to see the land sweep away from you, it becomes very apparent just how isolated you are out here.
Several miles down the way from Boylston, you’ll come to a road crossing with a vault toilet. This is one of the few places that you may venture off trail, but only to use the restroom.


The trail continues down, crossing a few more roads before coming to Doris, another rail depot that no longer exists. There are several military buildings on the left of the trail and a water tower as well. The right side of the trail has the remnants of the foundations from the old railroad buildings, but if you don’t know they are there, you’ll miss them.
At Doris, there is a sign directing you to potable water. There is a building down to the left, and it’s the only structure here that isn’t surrounded by a fence. Here you will find a spigot and there are instructions on the building for how to operate the pump.
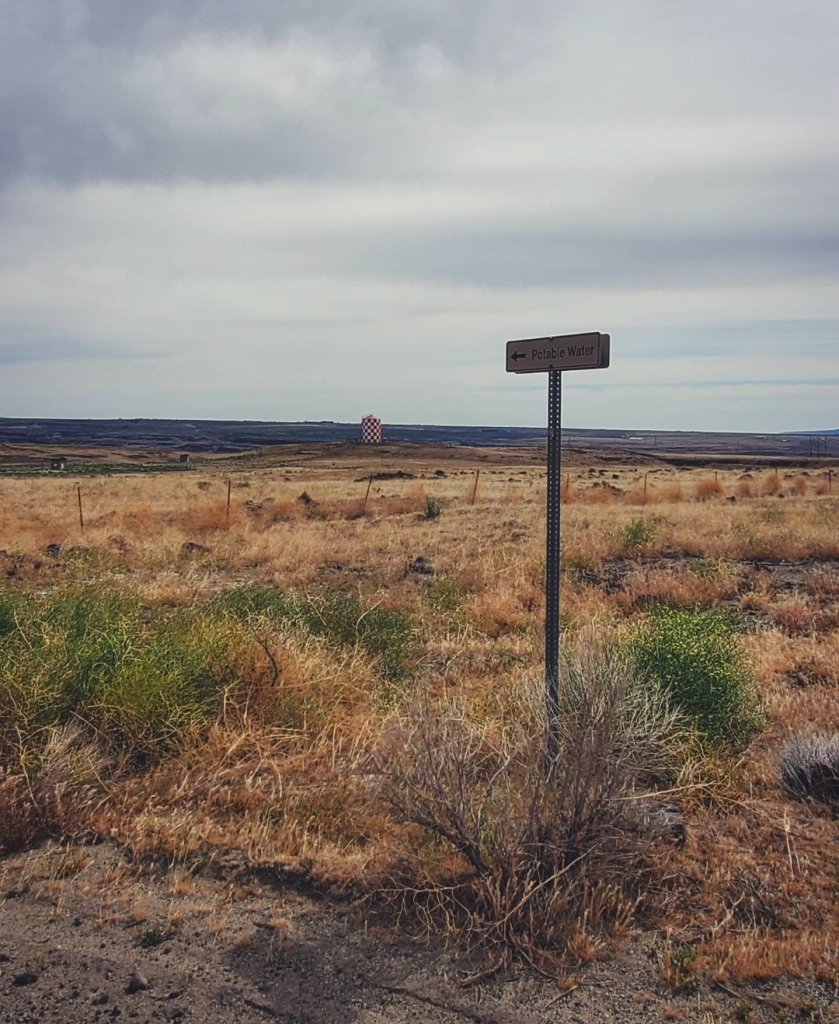

If you’re here in the hot season, this water can be a lifesaver. Give your head a soak, fill your bottles, and continue on your journey. *If you’re here in the colder months, I wouldn’t bank on this as a guaranteed source of water, as I’ve read other reports that the pumps were turned off in early spring.
Just past Doris there is another road crossing and the second Vault toilet. From here, the trail begins to drop pretty quickly to the Columbia, offering you small peeks of the river before finally opening up to the expanse of the Gorge. You’ll see Wanapum Dam down below as well as the Beverly Trestle, which spans the river.
The trail levels out as it reaches the river and you’ll cross Huntzinger Road before sweeping down to the bridge. There is a parking lot at the road crossing with a port-a-potty, but no other services.


The Beverly Bridge is a monument of the trail, and before its completion in April of 2022, there was no safe way to cross the river (riding a bicycle across the I-90 bridge with crosswinds, no shoulder, and 70mph traffic is not advised).
State Parks did a fantastic job preserving this piece of history, giving the public the ability to safely cross the Columbia River on foot, bicycle, horse, or any other non-motorized way you can think of. It’s really amazing to see the bridge in its current state, given what it looked like a few years ago.


*If you’re in need of camping before crossing the river, Wanapum State Park is just up Huntzinger Road north of the bridge . The campground has water and all of the other amenities you’d expect from a state park.
If you are interested in updates and progress to the trail, please visit The Friends of The Palouse To Cascades Trail . They do great work advocating for the trail and updating current conditions of trail surfaces and detours.
If you are looking for maps and GPS files, please visit Palouse to Cascades Trail Maps. It’s a site run by Marilyn Hedges who has been a tireless advocate for the trail.
Thank you for following along. I hope to see you out there.
Next: East of The Columbia

Better than a high five…
All of this is done on my own time, so if you find any or all of this information useful, a high five would be cool, but a beer or a coffee would be better. I have spent countless hours compiling all of this information and double checking it to ensure that it is correct, and I continually check it to ensure the information is up to date for anyone trying to plan their own journey. Any donation for my time is appreciated. Cheers!
$5.00
ENJOY YOUR STATE PARKS. PACK IT IN, PACK IT OUT. LEAVE NO TRACE.

Very great read! I really enjoyed it. My favorite part of the Palouse to Cascades Trail is the tunnels and trestles on the north end of Rock Lake, WA. Been there many times. Also a cool train tunnel on the same line just south of Plummer, ID.
LikeLike
I love this! This is what I have been looking for. I am jealous of DKLEIN and the OMTM rides I have been watching for years in the Oregon/Southern Washington area. I just moved back to Washington (Woodinville area) and I was about to post for like minded gravel riders. For me, I like to adventure every weekend, whether on mtn bike or gravel bike. Is there another forum/email group where I can be added to the list for upcoming adventures? Thanks Michael
LikeLike
Hey Michael, thanks for reading! I agree, the OMTM routes are so good, but it’s like a 3 hour drive to get to them. There is a FB group called Washington Gravel Riders that has a constant stream of solid route options, and if you get a pass from Campbell Global, you can have access to some pretty amazing gravel routes in your area. 🍻
LikeLike
Enjoyed this very much and found it useful.
LikeLike
Thank you, Sue!
LikeLike
Hello Joeski:
Terrific write-up! Thank you so much for sharing. I’m new to biking on former railroad grade and hope to complete the total ride next summerr. I have a hybrid street bike with narrow tires. Do you think I can convert it to a gravel bike with larger tires depending upon if they will fit and have a similar ride if my bike were a gravel or mountain bike? How wide are your tires in the photo? I’m more interested in going slow and comfort as opposed to speed. Thank you so much for sharing. Don
LikeLike
Hi Don, I typically ride at least a 45mm tire. I’m currently riding 47mm Teravail Cannonballs set up tubeless. They are (in my opinion) a perfect blend of comfort and speed.
My advice is to talk to your local bike shop and run the largest tire your frame will fit. Many hybrids will comfortably clear a pretty significant tire, especially if they have disc brakes. If you do have disc brakes, you can also look at swapping to 650b wheels to get even more tire clearance.
The bigger the tire you have, the more comfortable you will be, and the easier it will be to ride through deeper gravel and sand.
You can ride from Cedar Falls to Ellensburg on on a smaller tire but personally, I wouldn’t ride east of Kittitas on anything smaller than 45mm. East of the Columbia, I go even larger.
Good luck and happy riding! 🍻
LikeLike
Dear Joeski! Wow! I have a new friend. Someone who really has the experience and knowledge, and the kind heart to share your knowledge with everyone. A blessing. Can you recommend a good bike shop? I was thinking about going to Montlake. When I called them, they seemed very friendly and helpful and knowledgeable about the Palouse-Cascades trail. I live in Bellevue. Thank you again! With Gratitude, Don
LikeLike
Hey Don, Montlake is a great shop! Woodinville also has a great shop And knowledgeable staff. You’d do fine at either shop.
LikeLike
Thank you so much Joeski!!! I just came back from the Montlake store in Seattle and unfortunately, my bike will not fit a 45 mm so I am going to look for a new bike. Mike was terrific and spent a lot of time with me! He had a Salsa Journeyman at a reasonable price, but not my size. He said it is very difficult to find bikes these days. I’m hoping to stick with Gravel biking like the Palouse-Cascades trail so just need a “Chevy” and not a “Cadillac.” Thank you again so much!!! Oh by the way, I sure hoped you would have completed the whole trip to Tekoa. Your write-ups are perfect and so helpful!!! The best!
LikeLike
Thanks so much for the write up! I am planning to ride this over 3 days at some time in 2021. Debating whether the hardtail with 2.1ish tires or gravel bike with 45s will be best. Suggestions? I plan to go loaded and camp.
LikeLike
Hi! Thanks for reading. How far are you going? The bike choice will be largely a choice of your own comfort. As of this past summer, it’s pretty fast riding all the way to Kittitas, and the YTC is really the only place that requires a really big tire. I’m always a proponent of drop bars so I can move my hands around,and if your bike handling is solid, a 45mm tire should be great.
LikeLike
This was a wonderful description of the PTC west of the Columbia! Just great information. From campsites to gravel size, you hit all the important details. Thanks.
So you referred to the Great American Rail Trail. My wife and I hope to piece together the whole thing this coming summer. We (fortunately and greatfully) have the summer to ride the whole route. (And we hope to ride to Slaughter Beach, to finish the coast to coast. I have been mapping the route with Ride With GPS and things are coming together but our biggest question is: When can we begin the ride from La Push. I wonder how late in the year will you find snow on the trail near Snoqualmie Pass for example. We surely want to ride the tunnel but don’t want to start too early. Can you advise or suggest people I might contact regarding this issue? Thanks so much for all your detail regarding the PTC!
Andy Davis
LikeLike
Hi Andy,
That sounds like an amazing summer and I hope you realize that dream. In most years you can count on a clear trail by mid to late May. Just keep in mind that you might hit some serious spring showers on the peninsula, but it’ll be beautiful nonetheless.
The Palouse to Cascades Trail Coalition has a FB page and it gets updated with trail conditions. You can also ask on that page and get some pretty info in realtime.
Best of luck! Will you be posting photos and reports of your journey anywhere?
Joe
LikeLike
Thanks so much for the write up and photos. I found the link to this from the Adventure Cycling blog. I do not currently have a fat tire bike to do all sections of this route, but I’d like to do what I can on a Trek 520 with 32 tires…riding from Seattle unsupported would be ideal.
LikeLike
Hi Jeff, I had no idea I was linked to Adventure Cycling, so that’s pretty rad. On 32s you could definitely get all the way to the tunnel, and depending on your bike handling skills, you could make it all the way to Ellensburg. I did it on 35s one year and it was rough but I managed to do it. A few sections required walking and I took the paved option after Cle Elum.
LikeLike
This is an awesome resource. Thanks so much for putting it together. However, we only want to ride certain sections of the trail and found it very difficult to determine where to get access to those sections. It sure would be great to have a map with each section you talk about to make it easier to figure out where the trail is. And even more awesome would be access points on the maps.
LikeLike
Hi Joe. Encouraged by your great blog site, I did the Cedar Falls to Hyak section yesterday…Fantastic! Learned from experience the advantage of deflating tires a bit to smooth the ride, even though this is a very well maintained track. Also, came within 50 feet of a black bear and her cubs on the side of the trail about 6 miles from Cedar Falls as I was coming back down…of course the skedattled when I skidded to a stop…but pretty cool.
LikeLike
Absolutely great blog! We tried to ride west, uphill, from the beautiful new Beverly Bridge, intending to spend the night in Ellensburg and return to Beverly the next day. I bailed after 8 miles–gravel was too tough for me and the headwind was too strong. (My daughter graciously bailed with me but she probably could have made it.) I’ll try it again with bigger tires–mine were Continental Tourride 42-622–going downhill with a tailwind. Question for readers: how can you get from Beverly back to Ellensburg? Uber or shuttle?
LikeLike
Hi Joe, really appreciate the thorough beta. I’m inquiring to see if you’re aware of any shuttle services available on the trail. If possible, we’d like to have our car shuttled from Cedar Falls to the Columbia River. Thank you.
LikeLike
Hi Dale! Unfortunately I don’t know of any shuttle service outside of setting up your own support vehicle.
LikeLike
Thank you, Joe. No worries. I’m working through a couple of other venues with some early positive signs. My daughters and I will be embarking on our 12th annual Father/Daughter bike tour. Super excited and do very much appreciate your blog on this ride.
LikeLike